What is Metallography?
Metallography has been described as both a science and an art. Traditionally, metallography has been the study of the microscopic structure of metals and alloys using optical metallographs, electron microscopes or other surface analysis equipment. More recently, as materials have evolved, metallography has expanded to incorporate materials ranging from electronics to sporting good composites.
Metallography is the scientific study and analysis of the microstructure of metals and alloys. The term comes from the Greek words "metallon" (metal) and "graphos" (to write or describe), literally meaning "the description of metals." Through careful sample preparation and microscopic examination, metallography reveals the internal structure of materials, allowing scientists and engineers to understand how a material's structure relates to its properties and performance.

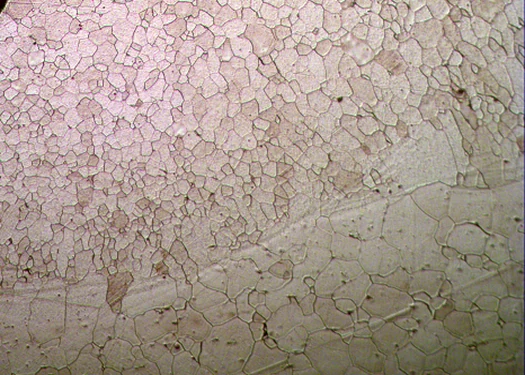
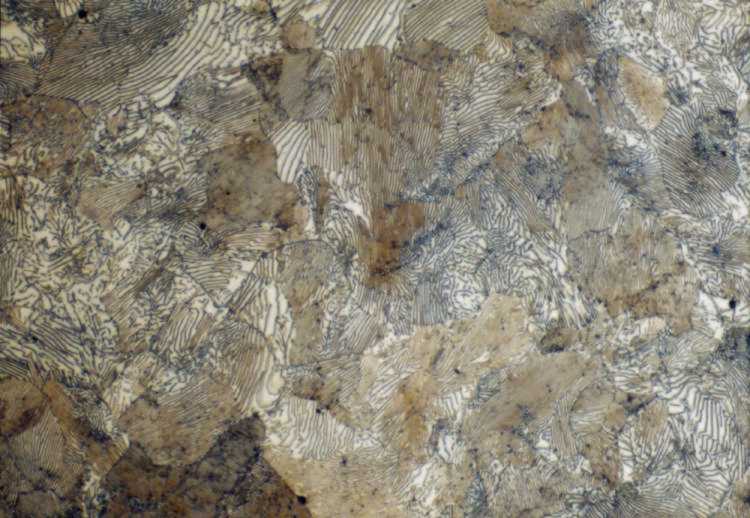
Example microstructure: Ferrite and pearlite in steel. Metallography reveals the internal structure that determines material properties.
At its core, metallography involves three main steps:
- Sample preparation: Cutting, mounting, grinding, polishing, and etching a representative sample to reveal its microstructure
- Microscopic examination: Observing the prepared sample under a metallurgical microscope to study its structure
- Analysis and interpretation: Understanding what the microstructure reveals about the material's composition, processing history, and properties
While the name suggests it's limited to metals, modern metallography techniques are also applied to ceramics, composites, polymers, and other engineering materials. The principles remain the same: prepare a sample to reveal its true structure, then examine and analyze it to understand the material.
Key Insight: Metallography bridges the gap between a material's processing history and its final properties. By examining microstructure, we can understand why a material behaves the way it does and how to improve it.
Why Metallography Matters
Metallography is fundamental to materials science and engineering because it provides direct insight into the relationship between structure and properties. The microstructure of a material (its grain size, phase distribution, defects, and other features) directly determines its mechanical, electrical, thermal, and chemical properties. As Dr. Zipperian put it, metallography is used in "materials development, incoming inspection, production and manufacturing control, and for failure analysis; in other words, product reliability."
What Metallography Reveals
Microstructural analysis answers questions about a wide range of features in a sample. If you're trying to figure out whether metallography is the right tool for your problem, the list below covers the most common types of analysis a metallographic lab performs:


- Grain size
- Porosity and voids
- Phase analysis
- Dendritic growth
- Cracks and other defects
- Corrosion analysis
- Intergranular attack (IGA)
- Coating thickness and integrity
- Inclusion size, shape, and distribution
- Weld and heat-affected zones (HAZ)
- Composite filler orientation
- Graphite nodularity
- Recast layers
- Carburizing thickness
- Decarburization
- Nitriding thickness
- Intergranular fracturing
- HAZ sensitization
- Flow-line stress
Adapted from Metallographic Handbook, Dr. Don Zipperian, 2011. The strip shows just a handful; every item above is something a properly prepared sample can resolve.
For a more detailed exploration of the purpose and applications of metallography, see our comprehensive guide on Purpose and Applications of Metallography.
Where it gets used
Every material's behavior, whether strong or weak, ductile or brittle, corrosion-resistant or susceptible, can be traced back to its microstructure. That makes metallography useful in three broad contexts:
Understanding behavior
Explain why a material is strong, hard, or tough; predict how it will perform; optimize heat treatment or mechanical working; diagnose the root cause of failures.
Quality control
Verify incoming materials, monitor production, validate batches, and document conformance to specifications and standards.
Research & development
Characterize new alloys, refine processing routes, and study the structure–property relationships at the heart of materials science.
Industry-specific examples (aerospace, automotive, medical devices, energy) live in the Applications section further down.
Basic Concepts and Terminology
Understanding metallography requires familiarity with key concepts and terminology. These fundamental terms will help you navigate the field and understand material structures.
Microstructure
The microstructure is the internal structure of a material as observed under a microscope. It includes:
- Grains: Individual crystals within a polycrystalline material. Grain size significantly affects material properties.
- Phases: Distinct regions with different chemical compositions or crystal structures (e.g., ferrite and cementite in steel).
- Grain boundaries: Interfaces between adjacent grains where atoms are less regularly arranged.
- Precipitates: Small particles of a second phase that form within the primary phase.
- Defects: Imperfections such as inclusions, voids, cracks, or dislocations.
Sample Preparation
Proper sample preparation is critical for accurate metallographic analysis. The process typically includes:
- Sectioning: Cutting a representative sample from the larger workpiece
- Mounting: Embedding the sample in resin for easier handling
- Grinding: Removing surface damage and creating a flat surface using progressively finer abrasives
- Polishing: Creating a mirror-like surface free of scratches
- Etching: Applying chemical reagents to reveal the microstructure
Common Microstructural Features
| Term | Definition | Significance |
|---|---|---|
| Grain Size | Average size of individual crystals | Affects strength, toughness, and ductility. Smaller grains generally increase strength. |
| Phase | Region with uniform composition and structure | Different phases have different properties. Phase distribution determines overall material behavior. |
| Grain Boundary | Interface between adjacent grains | Affects material properties and can be sites for precipitation or failure initiation. |
| Precipitate | Small particles of a second phase | Can strengthen materials (precipitation hardening) or affect other properties. |
| Inclusion | Non-metallic particles in the material | Can act as stress concentrators and affect mechanical properties, especially toughness. |
| Work Hardening | Increase in strength due to plastic deformation | Visible as elongated grains or deformation bands. Affects material formability. |
Magnification and Observation
Metallographic examination typically uses:
- Optical microscopy: Standard light microscopy at magnifications from 50x to 1000x. Most common for routine analysis.
- Scanning electron microscopy (SEM): Higher magnification (up to 100,000x+) and greater depth of field. Used for detailed analysis of fine features.
- Transmission electron microscopy (TEM): Very high magnification for atomic-scale analysis. Used in advanced research.
Learning Tip: Start with understanding grain structure and phases. These are the most fundamental microstructural features and appear in virtually all metallographic analysis.
The Sample Preparation Process
Successful metallographic analysis depends on proper sample preparation. A poorly prepared sample will not reveal the true microstructure, leading to incorrect conclusions. The preparation process follows a logical sequence, with each step building on the previous one.
Overview of the Preparation Steps
The standard metallographic preparation process consists of five main steps:
- 1 Sectioning Cut a representative sample (abrasive or precision wafering) with minimal damage.
- 2 Mounting Embed in resin (compression or castable) for safe handling and edge retention.
- 3 Grinding Progressively finer abrasives (e.g., 120 → 800 grit) to remove damage and flatten.
- 4 Polishing Diamond and oxide suspensions on soft cloths until the surface is mirror-bright.
- 5 Etching Apply a chemical reagent to attack phases and grain boundaries selectively, revealing structure.
Key Principles
Throughout the preparation process, several key principles apply:
- Progressive refinement: Each step removes damage from the previous step while introducing minimal new damage
- Consistency: Using standardized procedures ensures reproducible results
- Material-specific techniques: Different materials may require different approaches (e.g., soft materials need gentler techniques to avoid smearing)
- Quality at each step: Poor preparation at any step cannot be fully corrected later
- Documentation: Recording preparation parameters helps troubleshoot issues and reproduce results
Important: Sample preparation is both an art and a science. While the steps are straightforward, achieving excellent results requires practice, attention to detail, and understanding of material-specific requirements. Each material may need slight variations in technique.
Common Problems and Solutions
New metallographers often encounter specific problems during preparation. Understanding these issues and their solutions helps you achieve better results:
| Problem | Common Causes | Solutions |
|---|---|---|
| Scratches remaining after polishing |
|
|
| Edge rounding |
|
|
| Relief (height differences between phases) |
|
|
| Embedded abrasives |
|
|
| Over-etching |
|
|
| Under-etching |
|
|
| Contamination |
|
|
These challenges are normal and improve with experience. For more detailed solutions to common problems, see our Preparation Procedures section.
Microscopy Techniques
Once a sample is properly prepared, various microscopy techniques can be used to examine and analyze the microstructure. Each technique has specific advantages and applications. Understanding these techniques helps you select the appropriate method for your analysis needs.
For comprehensive information on preparing samples for microscopy, choosing the right microscope, detailed microscopy methods, and interpreting common microstructures, see our complete guide on Microstructural Analysis.
Quick Overview: Most routine metallographic analysis uses optical (metallurgical) microscopes with reflected light illumination. For higher magnification needs or fracture surface examination, scanning electron microscopy (SEM) is used. Advanced techniques like EBSD and TEM provide specialized information for research applications.
Phases and Phase Transformations
Understanding phases (distinct regions with uniform composition and crystal structure) is fundamental to metallography. Different phases have different properties, and the distribution, size, and morphology of phases determine overall material behavior. Phase transformations, driven by heat treatment and processing, create these microstructures.
Common Phases in Steels
Steels are iron-carbon alloys, and their microstructures consist of various phases that form depending on composition and heat treatment:

Ferrite (α-Fe)
BCC iron, low carbon solubility. Soft, ductile, magnetic. Etches light.
Austenite (γ-Fe)
FCC iron, higher carbon solubility. Stable hot, non-magnetic; transforms on cooling.
Martensite
Body-centered tetragonal phase from rapid quench. Very hard, low ductility; needle/lath morphology.

Pearlite
Alternating ferrite + Fe₃C lamellae from slow cooling. Moderate strength, good machinability.

Bainite
Intermediate between pearlite and martensite. Fine acicular structure; balances strength and toughness.
Cementite (Fe₃C)
Iron carbide. Very hard and brittle. Resists Nital (stays bright); Picral reveals carbide boundaries.
Grain boundaries (in one paragraph)
Grain boundaries are the interfaces between adjacent crystals in a polycrystalline material. They influence properties (finer grains generally mean stronger material), serve as preferential sites for second-phase precipitation and crack initiation, act as fast diffusion paths for creep and corrosion, and etch preferentially, which is what makes them visible under the microscope.
Phase transformations & processing effects
Heat treatment and mechanical processing change the microstructure. The most common transformations you'll see referenced:
| Step | What it does to the microstructure |
|---|---|
| Annealing | Slow cooling → soft, coarse structures (ferrite + pearlite in steel). |
| Normalizing | Air cooling → finer, more uniform structures. |
| Quenching | Rapid cooling → hard phases (martensite in steel). |
| Tempering | Reheats quenched material → reduces hardness, increases toughness. |
| Aging / precipitation | Time- and temperature-dependent second-phase formation. |
| Cold working | Deformation at low temps → elongated grains, work hardening. |
| Hot working | Deformation at high temps → recrystallization to new equiaxed grains. |
| Recrystallization & grain growth | New strain-free grains after cold work; further heating coarsens them. |
Key principle: The microstructure you observe is a snapshot of the material's processing history. Read it backward and you can infer what was done to the material, and forward to predict how it will behave.
Phase diagrams (equilibrium diagrams) show which phases should be stable at a given temperature and composition. Real microstructures often differ from equilibrium because of processing, but the diagram is the essential reference for "what's possible."
Applications of Metallography
Metallography finds applications across numerous industries and research areas. Understanding these applications helps illustrate the practical importance of the field.
For a comprehensive guide covering the purpose and detailed applications of metallography across different industries and use cases, see our Purpose and Applications guide.
Quality Control and Inspection
One of the most common applications is quality control in manufacturing:
- Material verification: Confirming that received materials meet specifications
- Process validation: Ensuring heat treatment, welding, or other processes produce the expected microstructure
- Batch testing: Verifying consistency across production batches
- Standards compliance: Meeting industry standards and specifications (ASTM, ISO, etc.)
Failure Analysis
When materials fail, metallography helps identify the cause:
- Fracture analysis: Examining fracture surfaces to understand failure mechanisms
- Root cause identification: Determining whether failure was due to material defects, processing issues, or service conditions
- Prevention strategies: Using failure analysis to prevent future failures
- Legal and insurance: Providing evidence in failure investigations
Research and Development
Metallography is essential in materials research:
- Alloy development: Characterizing new alloys and understanding structure-property relationships
- Process optimization: Determining optimal processing conditions for desired microstructures
- Fundamental studies: Researching phase transformations, grain growth, and other microstructural phenomena
- Material selection: Comparing different materials for specific applications
Industry-Specific Applications
Aerospace
- Titanium and superalloy characterization
- Coating and surface treatment analysis
- Fatigue and creep damage assessment
Automotive
- Steel and aluminum processing verification
- Heat treatment validation
- Weld quality assessment
Medical Devices
- Implant material characterization
- Biocompatibility studies
- Surface finish verification
Energy
- Power plant material analysis
- Pipeline and pressure vessel inspection
- Corrosion and degradation studies
Versatility: While metallography is often associated with metals, the same principles apply to ceramics, composites, and other materials. The goal is always to understand structure-property relationships.
Standards and Best Practices
Metallography is guided by established standards and best practices that ensure consistency, reproducibility, and quality. Following these standards is essential for reliable results and industry acceptance of your work.
ASTM Standards
The American Society for Testing and Materials (ASTM) publishes numerous standards relevant to metallography. ASTM Committee E-4 on Metallography, formed in 1916, has developed over 40 standards that guide metallographic practice. These standards are widely used in the United States and have influenced international standardization efforts. Key standards include:
| Standard | Title | Description |
|---|---|---|
| ASTM E3 | Standard Guide for Preparation of Metallographic Specimens | General procedures for sample preparation including sectioning, mounting, grinding, polishing, and etching. |
| ASTM E407 | Standard Practice for Microetching Metals and Alloys | Procedures and reagents for etching various metals and alloys to reveal microstructure. |
| ASTM E112 | Standard Test Methods for Determining Average Grain Size | Methods for measuring and reporting grain size, including comparison charts and intercept methods. |
| ASTM E883 | Standard Guide for Reflected-Light Photomicrography | Guidelines for capturing high-quality photomicrographs for documentation and analysis. |
| ASTM E1245 | Standard Practice for Determining the Inclusion or Second-Phase Constituent Content of Metals | Methods for quantifying non-metallic inclusions and second-phase particles. |
| ASTM E1382 | Standard Test Methods for Determining Average Grain Size Using Semiautomatic and Automatic Image Analysis | Computer-based methods for grain size measurement using image analysis software. |
ISO Standards
The International Organization for Standardization (ISO) also publishes standards for metallography, particularly for international trade and certification:
- ISO 643: Steels: Micrographic determination of the apparent grain size
- ISO 4499: Hardmetals: Metallographic determination of microstructure
- ISO 4967: Steel: Determination of content of non-metallic inclusions - Micrographic method using standard diagrams
- ISO 14250: Steel: Metallographic characterization of duplex grain size and distributions
Safety Considerations
Metallography involves working with chemicals, equipment, and potentially hazardous materials. Safety must always be a priority:
Chemical Safety
- Always read Safety Data Sheets (SDS) for all chemicals before use
- Use appropriate personal protective equipment (gloves, eye protection, lab coat)
- Work in well-ventilated areas, preferably in a fume hood when using etchants
- Store chemicals properly and label all containers clearly
- Dispose of chemical waste according to local regulations
- Never mix chemicals unless you know the reaction products are safe
Equipment Safety
- Follow manufacturer instructions for all equipment
- Use proper guards and safety features on cutting and grinding equipment
- Secure samples properly to prevent movement during cutting or grinding
- Be aware of rotating equipment and moving parts
- Keep work areas clean and organized to prevent accidents
- Use appropriate eye protection when operating any equipment
Best Practices for Quality Results
- Documentation: Record all preparation parameters (grit sizes, times, pressures, etchants, etching times) for reproducibility
- Consistency: Follow standardized procedures to ensure consistent results
- Cleanliness: Keep equipment and work areas clean to prevent contamination
- Calibration: Regularly calibrate equipment (microscopes, hardness testers, etc.)
- Reference samples: Maintain reference samples of known quality for comparison
- Training: Ensure operators are properly trained in techniques and safety
- Quality control: Establish quality control procedures and checkpoints
Standards Compliance: When working to meet specific standards or certifications, ensure you have the current version of relevant standards and follow them precisely. Standards are regularly updated, so check for revisions.
A Short History of Metallography
While humans have been working with metals for thousands of years, the scientific study of microstructure is relatively recent. The field as we know it today began with Henry Clifton Sorby (1826–1908), an English geologist and metallurgist. In 1863 Sorby adapted techniques from petrography (the study of rocks) to examine metals. He was the first to grind, polish, etch, and observe metals under a microscope. His work revealed that metals had internal structures (grains, phases, defects) that could be studied and related to material properties.
Since Sorby, metallography has evolved from a descriptive science into a quantitative discipline. The development of electron microscopy (SEM and TEM) in the mid-20th century enabled observation at much higher magnifications, and modern techniques like electron backscatter diffraction (EBSD), energy-dispersive X-ray spectroscopy (EDS), and automated image analysis provide unprecedented insight into material structure. The fundamental principles Sorby established remain valid today.
For the full story (ancient foundations, the Industrial Revolution era, electron microscopy developments, and modern digital techniques), see our complete History of Metallography guide.
Getting Started & Further Reading
Metallography is a skill that develops with practice. Don't be discouraged if your first samples aren't perfect; each one teaches you something. Below is a practical path, the books worth owning, and where the community gathers.
A practical learning path
- Ground yourself in the basics. You're already here; pair this guide with Equipment Overview, Safety Fundamentals, and Common Misconceptions.
- Walk through the prep steps in order: Sectioning → Mounting → Grinding → Polishing → Etching.
- Practice with simple materials first (carbon steel, aluminum), then move to your materials of interest using our material-specific guides.
- Use the support library: Preparation Procedures for step-by-step checklists, and Etchant Information for choosing the right reagent.
- Build a feedback loop. Document parameters, compare with reference micrographs, and ask experienced metallographers to critique your samples.
Essential books
If you can only buy two: start with Vander Voort and ASM Vol. 9. They cover most of what a working lab needs.
Organizations, conferences & standards bodies
- ASM International: handbooks, journals, courses; hosts ASM events and Materials Science & Technology (MS&T).
- International Metallographic Society (IMS): the metallography-focused community; hosts the IMS Annual Conference.
- TMS Annual Meeting: broader minerals/metals/materials, with deep metallography sessions.
- ASTM International (Committee E-4 on Metallography, formed 1916): develops the standards referenced in the Standards section above.
Ready for the next step?
Continue with the prep-process guides, browse the full library, or jump straight to the tools.