Introduction
Stainless steel is one of the most commonly analyzed materials in metallography. With chromium contents above 12% and varying additions of Ni, Mo, and other elements, stainless steels are generally softer than heat-treated carbon and tool steels, which makes them more susceptible to smearing during preparation. Mechanical preparation is straightforward; etching is the harder problem because the same corrosion resistance that gives stainless steel its name also resists most metallographic etchants.
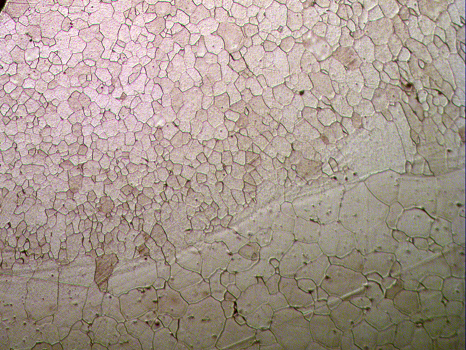
300-series austenitic stainless steel microstructure, properly prepared and etched (Carpenter's reagent, 20 s submerged). Correct preparation reveals the true grain structure and twin boundaries without introducing artifacts.
Stainless Steel Families at a Glance
- Austenitic (300 series): 304, 316, 321, etc. FCC γ-iron matrix; non-magnetic; the softest family and the most prone to smearing and work-hardening during prep. Most-analyzed for grain size, twin density, sensitization (Cr-carbide at grain boundaries), and service-induced σ-phase.
- Ferritic (400 series, lower-C): 430, 446, 409. BCC α-iron matrix; magnetic. Moderate hardness; sensitization and grain growth at high temperature are common QC concerns.
- Martensitic (400 series, higher-C): 410, 420, 440C, 431. BCC' martensite after quenching; harder, less prone to smearing. Hardness depends heavily on heat treatment.
- Duplex (2205, 2507, etc.): Roughly 50/50 ferrite + austenite microstructure. QC focuses on phase balance; color etching is the standard analysis method.
- Precipitation-Hardening (PH): 17-4 PH, 15-5 PH, 13-8 Mo. Martensitic matrix strengthened by aging-induced precipitates (Cu, Al, etc.). Heat-treatment-condition-dependent.
Softer austenitic grades like 304 and 316 work-harden during preparation; lighter polishing force and a longer 1 μm diamond step preserve the true microstructure. Harder martensitic and PH grades like 17-4 PH and 440C tolerate slightly more aggressive cutting and grinding but still benefit from the same SiC progression. The key is consistent light force (5-10 lb) and complete scratch removal at each grit before moving on.
Sectioning
When sectioning stainless steel samples, use a slow cutting speed to minimize heat generation and deformation. Harder grades like 17-4 PH Stainless Steel may require even slower speeds to prevent excessive heat buildup.

MAXCUT abrasive cut-off blades for stainless steel. MAX-E (general purpose) and MAX-I (intermediate hardness) are the standard choices for austenitic, ferritic, and as-supplied martensitic grades. Reserve MAX-VHS for fully hardened martensitic and precipitation-hardening grades (HRC > 45). Thin blades (0.5-1.0 mm) minimize heat generation and deformation.
- Use MAX-E or MAX-I series MAXCUT blades for most stainless steels (304, 316, 430, annealed 410/420). Step up to MAX-VHS only for fully hardened martensitic or PH grades (e.g., heat-treated 440C, aged 17-4 PH).
- Use a thin abrasive cut-off wheel (0.5-1.0 mm thickness)
- Apply steady, moderate pressure
- Use adequate coolant to prevent overheating
- Allow the wheel to do the cutting - avoid forcing
For more information on sectioning blades, visit our Abrasive Blades collection.
Mounting
Mounting provides edge retention and easier handling. For stainless steel, compression mounting with phenolic, epoxy, or diallyl phthalate resins all work well; diallyl phthalate offers the best edge retention of the three when fine surface features near the specimen edge must be preserved. If edge retention is critical (e.g., coatings, decarb studies), consider conductive mounting materials.
Compression Mounting
- Clean the sample thoroughly to remove cutting fluid and debris
- Place sample in mounting press with appropriate resin
- Apply pressure: 3000-4000 psi for phenolic, 2000-3000 psi for epoxy
- Heat to 150-180°C and hold for 5-8 minutes
- Cool under pressure to room temperature
For more information on mounting equipment, visit our Compression Mounting Equipment page.
Grinding
Grinding removes sectioning damage and prepares the surface for polishing. Start with coarse grits and progressively move to finer grits. For stainless steel, we recommend the following sequence:

Silicon carbide (SiC) grinding papers in graded grit sizes for progressive grinding of stainless steel. US grit numbers shown with their FEPA P-grade equivalents in parentheses. Rotate sample 90° between each grit to ensure complete scratch removal.
Grinding Sequence
Start at 240 grit. Coarser starting grits (e.g., 120) introduce deeper subsurface damage that smears in austenitic and annealed martensitic grades and is harder to remove later.
- 240 grit (P220): Plane the surface and remove sectioning damage (grind until plane, typically 30-60 seconds)
- 360 grit (P500): Remove 240-grit scratches (1 minute)
- 600 grit (P1200): Refine the surface (1 minute)
- 800 grit (P2400): Bridge to fine polishing (1 minute)
- 1200 grit (P4000): Final grinding step before diamond polish (1 minute)
Important: Rotate the sample 90° between each grit to ensure complete removal of previous scratches. Use water as a lubricant and maintain light, consistent pressure.
For more information on grinding supplies, visit our Silicon Carbide Grinding Papers collection.
Polishing
Polishing removes grinding scratches and prepares a mirror-like surface. For stainless steel, diamond polishing followed by oxide polishing typically yields excellent results.

Polycrystalline diamond compound provides aggressive cutting action ideal for hard materials like stainless steel.

Various polishing pads for different polishing stages. Select pad hardness based on material and polishing stage.
Diamond Polishing
Use DIAMAT polycrystalline diamond suspension with DIALUBE Purple extender as the lubricant. With the full SiC progression to 1200 grit (P4000), a single 1 μm DIAMAT step is sufficient for most stainless steel work. The 9 μm and 3 μm intermediate steps are useful only when the grinding sequence has been shortened.
- 1 μm DIAMAT diamond on ATLANTIS polishing pad: DIALUBE Purple Extender, 5-10 lbs per sample, 200/200 RPM (head/base, complementary rotation), 2 minutes.
- Optional: 9 μm DIAMAT on TEXPAN (3-5 minutes) and 3 μm DIAMAT on GOLD PAD (3-5 minutes) if grinding finished coarser than 1200 grit.
Final Polishing
Don's §11.5.3 specifies alumina rather than colloidal silica for stainless steel final polish. Alumina gives a cleaner final surface on the chromium-bearing matrix without the silica gel residue that can complicate subsequent etching, particularly the electrolytic oxalic acid etch used for 300-series.
- 0.05 μm Nanometer alumina on TRICOTE polishing pad: 5-10 lbs per sample, 100/100 RPM (head/base, complementary rotation), 1 minute.
- Rinse thoroughly with water, then ethanol. Dry with compressed air.
Pad Map & Parameters Summary
| Step | Surface | Abrasive / Lubricant | Force / sample | Speed (head/base) | Time |
|---|---|---|---|---|---|
| Plane grind | 240 grit SiC (P220) | Water | 5-10 lbs | 200/200 RPM | Until plane |
| Fine grind | 360 grit SiC (P500) | Water | 5-10 lbs | 200/200 RPM | 1 min |
| Fine grind | 600 grit SiC (P1200) | Water | 5-10 lbs | 200/200 RPM | 1 min |
| Fine grind | 800 grit SiC (P2400) | Water | 5-10 lbs | 200/200 RPM | 1 min |
| Fine grind | 1200 grit SiC (P4000) | Water | 5-10 lbs | 200/200 RPM | 1 min |
| Diamond polish | ATLANTIS | 1 μm DIAMAT + DIALUBE Purple | 5-10 lbs | 200/200 RPM | 2 min |
| Final polish | TRICOTE | 0.05 μm Nanometer alumina | 5-10 lbs | 100/100 RPM | 1 min |
Smearing is the primary risk for austenitic grades. If 304/316 samples show scratches that reappear after etching, the polish is producing a smeared work-hardened layer rather than removing material. The fix: extend the 1 μm DIAMAT step (3-4 min instead of 2) and reduce force to the lower end of 5-7 lb. Over-polishing on too soft a pad introduces relief around inclusions; staying with ATLANTIS at 200/200 RPM avoids this.
For more information on polishing supplies, visit our Diamond Abrasives and Polishing Pads collections.
Etching
Etching reveals the microstructure by selectively attacking grain boundaries and phases. The choice of etchant depends on the stainless steel grade and what features you want to reveal.

Stainless steel etched with appropriate etchant, magnification. Proper etching reveals grain boundaries and phase structure without over-etching artifacts.
Safety: read first. Glyceregia contains hydrochloric and nitric acids with glycerol; mix fresh and use immediately (it decomposes within hours, sometimes violently). Never store mixed Glyceregia in a closed container. Vilella's contains picric acid, which is shock-sensitive when dry, so keep solutions wet and dispose of through hazardous waste channels. Modified Murakami's contains potassium ferricyanide; never acidify (releases HCN gas) and use only in a fume hood. All etching in a fume hood with appropriate PPE.
Microetchants by Stainless Steel Family
The right etchant depends on the family. Austenitic, ferritic, martensitic, duplex, and PH stainless steels each respond to different reagents.
-
Vilella's Reagent: martensitic, ferritic, and PH stainless (400 series, 17-4 PH, 15-5 PH). Reveals martensite lath structure and prior austenite grain boundaries. Don's standard for 400-series imaging.
- Composition: 1 g picric acid + 5 mL HCl + 100 mL ethanol
- Use: Swab or immerse 5-60 seconds. Rinse with ethanol.
-
10% Oxalic Acid (Electrolytic): austenitic stainless (300 series). Reveals grain boundaries, twins, and Cr-carbide precipitation. The standard for general 304/316 imaging and for ASTM A262 Practice A sensitization testing.
- Composition: 10 g oxalic acid in 100 mL DI water
- Use: Sample as anode, stainless steel cathode, 6 V DC. 15-30 s for general structure; 90 s for ASTM A262 sensitization testing.
- A262 interpretation: Step (acceptable), Dual (acceptable), Ditched (sensitized; Cr-carbide network at grain boundaries, susceptible to IGSCC).
-
Glyceregia: austenitic and duplex stainless. Chemical alternative when an electrolytic cell is not available.
- Composition: 10 mL HNO3 + 20-30 mL HCl + 10 mL glycerol
- Use: Mix fresh just before use. Swab 10-60 seconds. Discard after one session. Never store in closed container (decomposes, pressurizes, can rupture).
-
Modified Murakami's Reagent: martensitic and PH stainless (Don's preference for 431). Reveals ferrite, chromium carbides, and sigma phase against an austenite or martensite matrix.
- Composition: 10 g K3Fe(CN)6 + 10 g KOH + 100 mL water
- Use: Heat to 50-80 °C; immerse 3-10 minutes. Do not acidify (HCN release).
-
Marble's Reagent: general-purpose for stainless, Ni-base, and Cu-Ni alloys; useful when Vilella's is too aggressive or Glyceregia not available.
- Composition: 10 g CuSO4 + 50 mL HCl + 50 mL water
- Use: Swab 5-60 seconds. Mix fresh.
-
Kalling's No. 2: duplex, austenitic, and martensitic stainless. Attacks ferrite preferentially in duplex; reveals martensite structure.
- Composition: 5 g CuCl2 + 100 mL HCl + 100 mL ethanol
- Use: Swab 30 s-2 min.
-
Beraha I (color etch): duplex stainless. Tints ferrite blue/brown while leaving austenite white, cleanly distinguishing the two phases for phase-balance measurement.
- Stock: 1000 mL water + 200 mL HCl + 24 g NH4HF2
- Working: 100 mL stock + 1 g K2S2O5, mixed just before use
- Use: Immerse until surface develops color (30 s-2 min).
-
Klemm's I (color etch): duplex stainless; alternative to Beraha. Stronger color contrast for digital phase-fraction image analysis.
- Composition: 50 mL saturated aqueous Na2S2O3 + 1 g K2S2O5
- Use: Immerse 30 s-3 min until colored.
-
Electrolytic 10% NaOH: reveals sigma phase in austenitic and duplex stainless without attacking ferrite or austenite matrix.
- Composition: 10 g NaOH in 100 mL water
- Use: Sample as anode, 2-6 V DC, 5-30 seconds. Sigma phase appears orange/brown.
Etchant Selection by Family
| Family | First choice | Alternative / Specialized |
|---|---|---|
| Austenitic (304, 316, 321) | 10% oxalic acid electrolytic (6 V) | Glyceregia (chemical); 10% NaOH electrolytic for σ phase |
| Ferritic (430, 446, 409) | Vilella's reagent | Marble's; Beraha for color |
| Martensitic (410, 420, 440C) | Vilella's reagent | Kalling's No. 2; Modified Murakami's for carbides |
| Martensitic PH (431) | Modified Murakami's (Don's preference) | Vilella's |
| Duplex (2205, 2507) | Beraha I (color) | Klemm's I; Kalling's No. 2 |
| PH (17-4, 15-5, 13-8 Mo) | Vilella's reagent | Marble's |
| Sensitization (any 300 series) | 10% oxalic acid electrolytic, 6 V, 90 s (ASTM A262 Practice A) | — |

Etching solutions and reagents for stainless steel. Common etchants include Vilella's Reagent, Beraha I, Glyceregia, and electrolytic oxalic acid. Etching time and method vary by family; see the table above.
Etching Procedure
- Ensure sample is clean and dry
- Apply etchant with cotton swab or immerse sample
- Etch for 5-30 seconds (time varies by etchant and grade)
- Immediately rinse with water, then alcohol
- Dry with compressed air
Tip: Start with shorter etching times and increase if needed. Over-etching can obscure fine details. Austenitic grades like 304 typically require 10-30 seconds, while martensitic grades may need only 5-15 seconds depending on the etchant used.
For more information on etchants, visit our Etchants collection.
Troubleshooting
Common Issues and Solutions
- Scratches reappear after etching (smeared work-hardened layer): Classic austenitic stainless problem. The polish is producing a smeared layer that hides scratches from grinding; etching dissolves the smear and the scratches reappear. Fix: extend the 1 μm DIAMAT step to 3-4 minutes; reduce force to 5-7 lb; verify the ATLANTIS pad is the right firmness (not loaded or worn). If scratches persist, return to 1200 grit (P4000) SiC paper with fresh paper and re-run the full sequence.
- Scratches remaining after polish: Insufficient time at one grit, or skipped grit in the SiC progression. Don's recipe is 240→360→600→800→1200; skipping any step leaves scratches that the next finer grit cannot remove in reasonable time.
- Relief around inclusions or MnS stringers: Over-polishing or too soft a pad. Reduce the 1 μm DIAMAT time to 1.5-2 minutes; verify ATLANTIS is the polishing pad (not a higher-nap final pad).
- Pitting after etching: Etchant too strong, time too long, or stale etchant. Mix Glyceregia and other reactive etchants fresh; reduce time. For oxalic acid electrolytic, reduce voltage from 6 V to 3-4 V or shorten time.
- No etch / weak structure (austenitic): Likely a passive film from polishing. Try a brief Glyceregia activation swab before the oxalic acid electrolytic etch, or increase electrolytic time. For very lean austenitics, a 10% NaOH electrolytic etch may be needed to reveal sigma phase if present.
- Cr-carbide network at grain boundaries (sensitization): Not a preparation problem; this is the actual microstructure. Document with oxalic acid electrolytic per ASTM A262 Practice A. The "ditched" structure means the material is sensitized; "step" or "dual" structures are acceptable.
- Duplex phase boundaries unclear: Standard Vilella's or oxalic acid will not adequately distinguish ferrite from austenite in duplex grades. Switch to Beraha I or Klemm's I color etch.
- Embedded SiC particles (bright/dark spots after polish): SiC paper was loaded or over-aged. Replace papers more frequently; ensure adequate water flow during grinding. The 1 μm DIAMAT polish on ATLANTIS will lift most embedded SiC if extended.
- Magnetic ferritic samples disturbing automatic polisher: Ferritic and PH grades attract residual magnetic field on equipment. Demagnetize the polishing head and use non-magnetic specimen holders.
- Sensitization or σ-phase forming during mounting: Hot compression mounting at 150-180 °C overlaps with the sensitization range (450-850 °C is the worst, but extended time at lower temperature contributes). For samples being analyzed for sensitization or service-induced σ-phase, use castable epoxy mounting to avoid the thermal cycle.
- Contamination between samples: Clean ultrasonically between steps; rinse pads thoroughly. Different stainless grades can transfer iron particles to each other, particularly important when imaging Cu or Ni contamination in stainless or vice versa.
- Glyceregia container pressurized: Decomposition products. Discard immediately into appropriate waste; do not open further. Mix in small batches and never close the container after mixing.
Additional Reading
- Zipperian, D.C. Metallographic Handbook, Section 11.5.3 (Stainless Steel). PACE Technologies, Tucson, AZ. The house reference. The SiC progression, ATLANTIS-with-DIAMAT, TRICOTE-with-alumina sequence, and family-specific etchant choices come from this source.
- ASM Handbook, Vol. 9: Metallography and Microstructures. ASM International. Comprehensive stainless steel preparation, etching, and microstructure interpretation.
- Vander Voort, G.F. Metallography: Principles and Practice. ASM International. Detailed etchant procedures including color etching for duplex stainless.
- Petzow, G. Metallographic Etching, 2nd ed. ASM International. Comprehensive reference for Vilella's, Glyceregia, Marble's, Kalling's, Beraha, Klemm, and Modified Murakami's formulations.
- ASTM A262 — Standard Practices for Detecting Susceptibility to Intergranular Attack in Austenitic Stainless Steels (Practice A: oxalic acid etch test, Step/Dual/Ditched classification).
- ASTM E407 — Standard Practice for Microetching Metals and Alloys (stainless steel etchants section).
- ASTM E3 — Standard Guide for Preparation of Metallographic Specimens.
- ASTM E112 — Standard Test Methods for Determining Average Grain Size.
- ASTM E562 — Standard Test Method for Determining Volume Fraction by Systematic Manual Point Count (relevant for duplex phase balance and inclusion content).
- ASTM E1245 — Standard Practice for Determining Inclusion or Second-Phase Constituent Content by Automatic Image Analysis (applicable to phase fraction in duplex and PH grades).
Explore More Procedures
Browse our comprehensive procedure guides for material-specific preparation methods and get personalized recommendations.