Introduction
Tool steels and hardened steels are among the most challenging materials to prepare for metallographic analysis. These materials are very hard (typically 200-450 HB, 20-50 HRC) and contain complex carbide structures that must be preserved throughout preparation. The high hardness requires extended grinding and polishing times, while the presence of carbides demands careful techniques to avoid pullout or damage.
Critical Principle: Carbide preservation is essential. Carbides are hard, brittle phases that can be pulled out during grinding and polishing, leaving voids in the microstructure. Extended preparation times and careful monitoring are required.
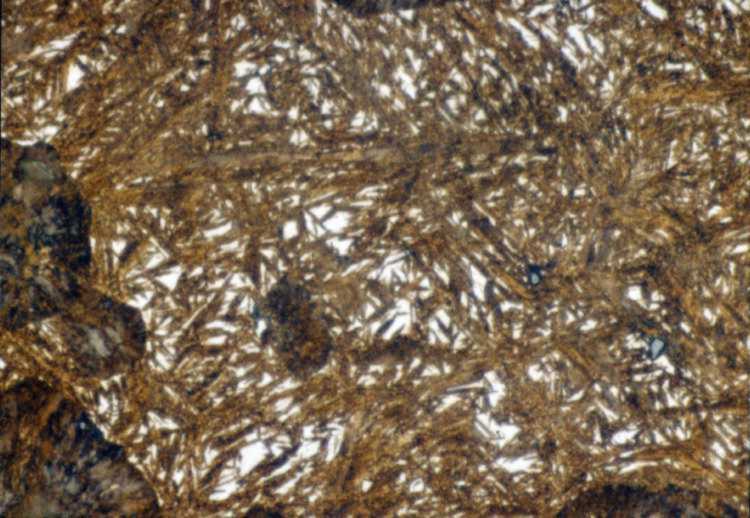
1095 Steel water quenched to martensite, Vilella's reagent, 1000X magnification. Tool steels and hardened steels typically show martensitic structures with carbides. Proper preparation preserves carbides while revealing the matrix microstructure.
This guide covers several categories of very hard materials:
- Tool Steels: Air-hardening (A2, A4, A6), oil-hardening (O1), high-speed steels (M2, M42), hot-work (H11, H13, H21), and cold-work (D2) tool steels
- Through-Hardened Steels: Steels like 1080, 52100, and 4340 in their hardened condition
- Case-Hardened Steels: Carburized or nitrided steels like 8620 and 9310 with hardened surface layers
All of these materials share common preparation challenges: very high hardness, presence of carbides, and the need for extended preparation times. The techniques described here apply to all of them, with specific notes for particular material types.
Sectioning
Per Don §11.8.1, use a MAXCUT MAX-E or MAX-I series blade for tool steels. Despite the high hardness, these alumina-bonded blades cut hardened steels efficiently when paired with slow feed and adequate coolant. MAX-VHS is a heavier alternative for case-hardened sections but is not Don's primary recommendation; MAX-E is faster and cleaner for the majority of tool-steel work.

MAX-E (alumina/resin-bonded) cut-off blade for tool steels and hardened steels. MAX-I is the industrial thin-blade alternative.
- Blade: MAX-E or MAX-I series (alumina-bonded). MAX-VHS is acceptable for very large or case-hardened sections but not required for most work.
- Feed: Slow and steady; let the blade cut. Forcing the cut generates heat that can temper the surface and produces a deep HAZ that grinding must remove.
- Coolant: Flood continuously. Heat at the cut surface can locally temper the martensite and produce a soft, dark band that misleads hardness analysis.
- Blade thickness: Thin (0.5-1.0 mm) precision blades minimize HAZ depth.
- Case-hardened sections: Cut perpendicular to the case so the case-core interface is preserved in cross-section.
For more information on sectioning blades, visit our Abrasive Blades collection.
Mounting
Per Don §11.8.1, mount tool steels with epoxy or diallyl phthalate (DAP) compression resin. Phenolic is not recommended for hardened steels; it has higher shrinkage than epoxy or DAP, which produces gaps at the mount-sample boundary that compromise edge retention exactly where the case-core interface, decarburization, or carbide-rich edge needs to be measured. Mineral-filled (edge-retention grade) epoxy is the best choice when case-depth measurement is the analytical target.
Compression Mounting
- Clean the sample thoroughly to remove cutting fluid and debris.
- Place sample in mounting press with epoxy or DAP resin. Use mineral-filled epoxy for best edge retention.
- Apply pressure: 2000-3000 psi for epoxy, ~4200 psi for DAP.
- Heat to 150-180 °C and hold 5-8 minutes (resin dependent). The thermal cycle is well below tempering temperature for most tool steels and will not affect hardness.
- Cool under pressure to room temperature.
For case-hardened steels: Mount with the case edge facing the ram so it is fully supported during polishing. Mineral-filled epoxy is essential; the case is harder than the core and standard resins polish away faster, rounding the interface.
For more information on mounting equipment, visit our Compression Mounting Equipment page.
Grinding
Don §11.8.1 replaces the conventional SiC paper progression with a single rigid 120 µm diamond grinding disk for the plane-grinding step. The rigid diamond disk cuts hardened steels (HRC 60+) cleanly and uniformly; SiC papers wear quickly against these materials, glaze into a polish action partway through, and produce inconsistent removal. The rigid disk also maintains flatness across the carbide-rich microstructure, which is what preserves carbides through the subsequent polishing steps.

Rigid 120 µm diamond grinding disc, which replaces a multi-step SiC paper progression for tool steels and hardened steels. Cuts faster, maintains flatness, and prevents carbide pullout at the plane-grinding step.
Plane Grinding (Don §11.8.1)
- 120 µm diamond grinding disk: Water lubricant, 5-10 lb per sample, 200/200 rpm head/base, grind until plane.
This single step replaces the entire SiC paper progression for hardened steels. Maintain consistent 5-10 lb force; excessive pressure can fracture brittle carbides at the plane-grind stage and the damage propagates into all subsequent steps.
For more information on grinding supplies, visit our Diamond Grinding Discs collection.
Polishing
Don §11.8.1 polishes tool steels and hardened steels on rigid composite discs (SIRIUS and ORION) at the 9 µm and 3 µm diamond steps, then moves to GOLDPAD for 1 µm diamond and TRICOTE for the final alumina. The rigid composite discs are essential; carbides (M6C, MC, M2C, M23C6, M7C3) are harder than the martensite matrix and polish at a different rate. Woven cloths at these intermediate steps produce visible relief around carbides; rigid composite discs maintain flatness so carbides stay flush with the surrounding matrix.
Carbide preservation is the key. Tool-steel carbides are brittle and easily pulled out if force is too high or pad stiffness is too low. Don's procedure (rigid composite discs at 9/3 µm, GOLDPAD at 1 µm, TRICOTE at the alumina final) is specifically designed to keep carbides flush. Substituting softer pads at any step produces noticeable relief or pullout.
Diamond Polishing on Rigid Composite Discs
- 9 µm DIAMAT diamond on SIRIUS composite disk: DIALUBE Purple Extender, 5-10 lb, 200/200 rpm, 3 minutes.
- 3 µm DIAMAT diamond on ORION composite disk: DIALUBE Purple Extender, 5-10 lb, 200/200 rpm, 3 minutes.
- 1 µm DIAMAT diamond on GOLDPAD polishing pad: DIALUBE Purple Extender, 5-10 lb, 200/200 rpm, 2 minutes.
Final Polishing
- 0.05 µm Nanometer alumina on TRICOTE polishing pad: 5-10 lb, 100/100 rpm, 1 minute.
- Rinse thoroughly with water, then ethanol; dry with compressed air. Do not wipe.
Pad Map & Parameters Summary (Don §11.8.1; same procedure for nitrided steel §11.8.2)
| Step | Surface | Abrasive / Lubricant | Force / sample | Speed (head/base) | Time |
|---|---|---|---|---|---|
| Plane grind | 120 µm diamond disc | Water | 5-10 lb | 200/200 rpm | Until plane |
| Rough polish | SIRIUS composite disc | 9 µm DIAMAT + DIALUBE Purple | 5-10 lb | 200/200 rpm | 3 min |
| Intermediate | ORION composite disc | 3 µm DIAMAT + DIALUBE Purple | 5-10 lb | 200/200 rpm | 3 min |
| Intermediate | GOLDPAD | 1 µm DIAMAT + DIALUBE Purple | 5-10 lb | 200/200 rpm | 2 min |
| Final polish | TRICOTE | 0.05 µm Nanometer alumina | 5-10 lb | 100/100 rpm | 1 min |
Nitrided Steel (Don §11.8.2)
Nitrided steels, produced by 500-540 °C ammonia-atmosphere treatment for ~50 hours, have a very hard nitride case (HV ~1100, case depth ~0.4 mm) that responds to the same procedure as tool steel. Use the identical 120 µm diamond disc + SIRIUS/ORION/GOLDPAD/TRICOTE sequence above. Pay particular attention to edge retention through the mounting step (mineral-filled epoxy preferred) because the nitride case-to-core transition is the primary analytical target.
For high-speed steels (M2, M42) and high-carbide tool steels (D2): These contain high volume fractions of M6C, MC, and M2C carbides that are particularly prone to relief. Stay strictly within Don's recipe; do not substitute woven cloths at the 9 or 3 µm steps, and do not extend the GOLDPAD step beyond 2 minutes.
For more information on polishing supplies, visit our Diamond Abrasives and Polishing Pads collections.
Etching
Etching reveals the microstructure by selectively attacking grain boundaries and phases. For tool steels and hardened steels, the choice of etchant depends on the material type, heat treatment, and what features you want to reveal. Nital and Vilella's Reagent are the most common etchants.

Tool steel microstructure after proper etching. The matrix structure and carbides are revealed by appropriate etching.
Safety: read first. Picric acid (in Vilella's, Picral, Superpicral) is shock-sensitive when dry; keep solutions wet and dispose through hazardous waste channels. Murakami's reagent contains potassium ferricyanide; never acidify (releases HCN gas). Groesbeck's contains permanganate and caustic. All etching in a fume hood with appropriate PPE.
Microetchants for Tool Steels (Don's Table LV)
-
Nital: the standard etchant. Reveals ferrite grain boundaries and ferrite-carbide interfaces in annealed samples; preferred for revealing martensite; reveals prior austenite grain boundaries in as-quenched and lightly tempered high-alloy steels.
- Composition: 1-10 mL HNO3 + 90-99 mL ethanol
- Use: Immerse. Do not store solutions with more than 3% HNO3 in ethanol; mix fresh in higher concentrations as needed.
-
Vilella's Reagent: recommended for annealed structures and those containing pearlite or bainite; does not reveal ferrite grain boundaries in annealed specimens. Best for revealing martensitic structures and prior austenite grain boundaries.
- Composition: 1 g picric acid + 5 mL HCl + 100 mL ethanol
- Use: Immerse.
-
Picral (4% picric in ethanol): same applications as Vilella's; better for resolving pearlite lamellae and bainite carbides without attacking ferrite grain boundaries.
- Composition: 4 g picric acid + 100 mL ethanol
- Use: Immerse; 10-20 drops of zephiran chloride increases etch response.
-
Superpicral: stronger Picral variant for slow-etching alloys.
- Composition: 10 g picric acid + 100 mL ethanol
- Use: Must be heated to dissolve picric acid. Immerse up to 1 minute or more. A few drops of HCl may be added to increase etch rate.
-
Murakami's Reagent: cold, darkens chromium carbides and tungstides without attacking cementite; hot, attacks cementite. Standard for distinguishing carbide types in high-Cr and high-W tool steels (D2, M2, M42).
- Composition: 10 g K3Fe(CN)6 + 7 g NaOH (or 10 g KOH) + 100 mL DI water
- Use: Immerse with fresh solution, hot, or cold for up to 10 minutes. Do not acidify.
-
Groesbeck's Reagent: outlines and colors Fe2Mo and Mo6C (blue and brown respectively), attacks Mo2C, (Fe,Cr)23C6, but not (Fe,Mo)23C6. Useful for Mo-bearing high-speed steels.
- Composition: 4 g KMnO4 + 4 g NaOH + 100 mL DI water
- Use: Immerse at 20 °C.
-
Tool steels, alkaline H2O2: outlines (later also colors) Mo2C, Fe2Mo and M6C.
- Composition: 10 mL H2O2 (30%) + 20 mL 10% aqueous NaOH
- Use: Immerse 10 seconds at 20 °C.
-
Tool steels, saturated permanganate: attacks Mo2C and M7C3, M6C outlined and colored brown.
- Composition: 4 g NaOH + 100 mL saturated aqueous KMnO4
- Use: Immerse at 20 °C.
Etchant Selection by Application
| Application | First choice | Alternative |
|---|---|---|
| General tool steel (as-quenched or tempered) | 2-4% Nital | Vilella's |
| Annealed pearlite / bainite resolution | 4% Picral | Vilella's; Superpicral |
| Prior austenite grain boundaries | Vilella's | 2-4% Nital (lightly tempered alloy steels) |
| Carbide type ID (Cr-bearing: D2, A2) | Murakami's (cold) | Sequential Nital + Murakami's |
| High-speed steel carbides (M2, M42) | Murakami's or Groesbeck's | Vilella's for general structure |
| Nitrided case (white layer + diffusion zone) | 2-4% Nital | Picral for diffusion zone carbides |

Etching solutions and reagents for tool steels and hardened steels. Common etchants include Nital, Vilella's Reagent, and Murakami's Reagent.
Etching Procedure
- Ensure sample is clean and dry after polishing
- Apply etchant with cotton swab or immerse sample
- Etch for 10-30 seconds (time varies by material type and hardness)
- Immediately rinse with water, then alcohol
- Dry with compressed air
Important Notes:
- Start with shorter etching times (10-15 seconds) and increase if needed
- For very hard materials, longer etching times (20-30 seconds) may be needed
- Vilella's Reagent is particularly useful for tool steels and high-speed steels with complex carbides
- Murakami's Reagent is excellent for revealing carbides in high-speed steels (M2, M42)
- For case-hardened steels, etching reveals the case microstructure and case depth
- Over-etching can obscure fine details - start with shorter times
For High-Speed Steels (M2, M42): These contain complex carbides that may require specialized etchants like Murakami's Reagent to reveal properly. Vilella's Reagent is also effective.
For Case-Hardened Steels: Etching reveals the case microstructure and allows measurement of case depth. Use appropriate etchants to reveal the case-core interface clearly.
For more information on etchants, visit our Etchants collection.
Troubleshooting
Common Issues and Solutions
- Carbide pullout: Too much pressure during grinding or polishing, or inappropriate pad hardness. Reduce pressure, use softer pads for fine steps, and monitor the surface carefully. Carbides are hard and brittle and can be pulled out easily.
- Scratches remaining: Insufficient grinding/polishing time. These materials are very hard and require extended times (60-120 seconds per grit, 5-8 minutes per polishing step). Ensure complete scratch removal at each step.
- Relief around carbides: Over-polishing or too soft a pad. Reduce polishing time or use slightly harder pad, but still maintain moderate pressure to avoid carbide pullout.
- Contamination: Clean between steps, use fresh abrasives, and ensure proper sample cleaning.
- Poor edge retention: Consider using phenolic mounting material or different mounting technique. For case-hardened steels, edge retention is critical for case depth measurement.
- Over-etching: Reduce etching time or use lower etchant concentration. Start with shorter times (10-15 seconds).
- Under-etching: Increase etching time or use higher etchant concentration. These materials are very hard and may require longer etching times (20-30 seconds).
- Phase transformation during cutting: Use slower cutting speed and adequate coolant to prevent overheating. These materials are sensitive to heat.
- Case-core interface not visible: For case-hardened steels, ensure proper mounting with edge exposed, use appropriate etching, and preserve edge retention throughout preparation.
Remember: Tool steels and hardened steels are very hard and require extended preparation times. The most common mistakes are insufficient time per step and excessive pressure that causes carbide pullout. Always err on the side of longer times and careful monitoring.
Additional Reading
- Zipperian, D.C. Metallographic Handbook, §11.8 (Class 8 Hardened Steels), §11.8.1 (Tool Steels), §11.8.2 (Nitrided Steel), and Table LV (Selected Etchants for Tool Steels). PACE Technologies, Tucson, AZ. The house reference for the 120 µm diamond disc + SIRIUS/ORION/GOLDPAD/TRICOTE sequence and the complete etchant table used in this guide.
- ASM Handbook, Vol. 9: Metallography and Microstructures. ASM International. Comprehensive tool steel preparation, heat-treatment-state interpretation, carbide identification, and case-hardening evaluation.
- Vander Voort, G.F. Metallography: Principles and Practice. ASM International. Detailed Vilella's, Picral, and Murakami's procedures plus interpretation of tool-steel microstructures.
- Petzow, G. Metallographic Etching, 2nd ed. ASM International. Comprehensive etchant reference for tool steels including Groesbeck's and specialty carbide-discriminating reagents.
- ASTM E407 — Standard Practice for Microetching Metals and Alloys (tool steel etchants section).
- ASTM E3 — Standard Guide for Preparation of Metallographic Specimens.
- ASTM E45 — Standard Test Methods for Determining the Inclusion Content of Steel (applies to ingot/wrought tool steel inclusion analysis).
- ASTM E112 — Standard Test Methods for Determining Average Grain Size (applies to prior austenite grain size after Vilella's etch).
- ASTM E384 — Standard Test Method for Microindentation Hardness of Materials (case-depth profiling).
- ASTM E1077 — Standard Test Methods for Estimating the Depth of Decarburization of Steel Specimens.
- ASTM A255 — Standard Test Methods for Determining Hardenability of Steel (Jominy and grossmann methods).
Explore More Procedures
Browse our comprehensive procedure guides for material-specific preparation methods and get personalized recommendations.