
Preparation Procedures / Aluminum

Step-by-Step Guide to Aluminum Sample Preparation

Aluminum and its alloys are foundational in aerospace, automotive, and structural engineering. Their low density, corrosion resistance, and mechanical versatility demand precise metallographic preparation for effective microstructural analysis. This comprehensive guide provides expert-recommended procedures for preparing aluminum specimens.

2024 Aluminum Alloy Microstructure
Key Challenges in Aluminum Preparation
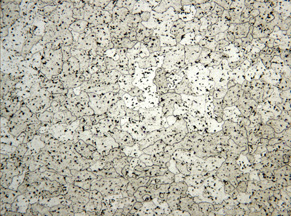
  • Preserving oxide inclusions — aluminum-oxide particles are routine in the microstructure and are often the analysis target; improper prep pulls them out and misrepresents the structure
  • Avoiding SiC embedding (start on aluminum-oxide / ALO paper, not SiC)
  • Keeping the deformation layer shallow with light force (5-10 lb / 22-45 N)
  • Avoiding smearing and grain pull-out during preparation
  • Maintaining microstructural integrity through every step
Technical Considerations
  • Aluminum's low melting point (660°C) and ductility require careful temperature and force control
  • Soft nature (typically 20-100 HV) demands gentle preparation throughout
  • Precipitation-hardened T6 tempers (2024-T6, 6061-T6, 7075-T6) are heat-sensitive — compression mounting at 150-180°C can shift the precipitate distribution; use castable epoxy for these tempers
  • High thermal conductivity necessitates proper cooling; rapid oxidation requires immediate post-preparation protection

Want to keep track of your preparation procedures? Save your workflow procedures on materialsprep.com

Step 1: Sample Selection and Planning

Essential Steps

  • Identify the area of interest and mark it clearly
  • Document sample orientation and any critical features
  • Measure sample dimensions to determine mounting requirements
  • Clean sample surface to remove any contaminants
  • Plan for water-lubricated SiC papers to reduce heat and smearing
💡

Expert Guidance

Pre-Planning Checklist

  • Sample orientation relative to critical features
  • Required analysis type (grain structure, phase distribution, etc.)
  • Alloy composition and hardness
  • Mounting requirements based on sample size and shape
⚙️

Technical Parameters

  • Document alloy composition and heat treatment
  • Note any surface treatments or coatings
  • Identify critical features requiring preservation
  • Plan for potential edge retention challenges

Step 2: Sectioning

Essential Steps

  • Select appropriate cutting wheel based on alloy hardness
  • Set cutting parameters (speed, feed rate, coolant flow)
  • Secure sample firmly in vise or fixture
  • Make cut perpendicular to area of interest
  • Clean cut surface thoroughly after sectioning
💡

Expert Guidance

Sectioning Best Practices

  • Use slow-speed saws (≤300 RPM) to minimize heat generation
  • Apply minimal force during cutting to prevent work hardening
  • Use water-based coolant to prevent thermal damage
  • Consider using precision wafering saws for critical applications
⚙️

Technical Parameters

  • Cutting speed: 100-300 RPM
  • Feed rate: 0.5-1.0 mm/min
  • Coolant flow: 2-3 L/min
  • Wheel selection: MAXCUT MAX-C or MAX-I series abrasive blade (designed for soft and medium-soft non-ferrous metals)

Step 3: Mounting

Essential Steps

  • Clean sample thoroughly before mounting
  • Select appropriate mounting material
  • Follow manufacturer's mixing and curing instructions
  • Allow complete curing before proceeding
  • Grind mounting material flush with sample surface
💡

Expert Guidance

Mounting Selection

  • Default: compression mounting with phenolic, epoxy, or diallyl phthalate (DAP) resins
  • Heat-sensitive precipitation-hardened tempers (2024-T6, 6061-T6, 7075-T6, A356-T6): use castable epoxy — the 150-180°C compression cycle overlaps the ageing temperature and can shift the precipitate distribution
  • For edge retention on irregular or porous samples: low-viscosity castable epoxy with vacuum impregnation
  • For SEM/EBSD work: consider conductive mounting materials
⚙️

Technical Parameters

  • Mounting pressure: 200-300 bar
  • Curing temperature: 150-180°C
  • Curing time: 5-7 minutes
  • Cooling rate: 2-3°C/min

Step 4: Grinding

Essential Steps

  • Begin on 1200 grit ALO (aluminum-oxide) paper for the plane grind — ALO does not embed into aluminum the way SiC does
  • Progress to fine SiC: 800 grit (P2400), then 1200 grit (P4000)
  • Use water lubricant and light force (5-10 lb / 22-45 N) throughout
  • Rotate sample 90° between steps to confirm scratch removal
  • Clean sample between steps
💡

Expert Guidance

Grinding Parameters

  • Plane grind on 1200 grit ALO paper, not SiC — protects oxide inclusions from being knocked out and prevents SiC embedding in the soft matrix
  • Use water lubricant on every step
  • Maintain light force throughout (5-10 lb / 22-45 N)
  • Use 100/100 rpm head/base speed for gentle, consistent removal
  • Rotate sample 90° between grits to confirm complete scratch removal from the previous step
⚙️

Technical Parameters

Step Abrasive Lubricant Time Force RPM (Head/Base)
1 (Plane) 1200 grit ALO paper Water Until plane 5-10 lb (22-45 N) 100/100
2 800 grit (P2400) SiC paper Water 1 min 5-10 lb (22-45 N) 100/100
3 1200 grit (P4000) SiC paper Water 1 min 5-10 lb (22-45 N) 100/100

Step 5: Polishing

Essential Steps

  • Rough polish with 1 µm DIAMAT diamond on ATLANTIS polishing pad using DIALUBE Purple Extender lubricant
  • Final polish with 0.05 µm Nanometer alumina on NAPPAD polishing pad
  • For high-strength heat-treated alloys (2024-T6, 6061-T6, 7075-T6) and cast Al-Si: insert an optional 3 µm DIAMAT step before the 1 µm polish
  • Keep force light (5-10 lb / 22-45 N) and time short to preserve oxide inclusions
  • Clean thoroughly between steps
💡

Expert Guidance

Polishing Strategy

  • Use 1 µm DIAMAT diamond on ATLANTIS pad for the rough polish — single step is sufficient on pure and softer aluminum alloys after the fine SiC grinds
  • Use 0.05 µm Nanometer alumina on NAPPAD for the final polish — preserves oxide inclusions at their true position (alumina is purely mechanical; colloidal silica's slight chemical attack can lift oxides)
  • Use DIALUBE Purple Extender lubricant for the 1 µm DIAMAT polish
  • For 2024-T6, 6061-T6, 7075-T6, A356, A380: add an intermediate 3 µm DIAMAT step on ATLANTIS pad before the 1 µm polish
  • Keep force at 5-10 lb (22-45 N) and 100/100 rpm head/base speed
  • Monitor surface quality under microscope between steps
⚙️

Technical Parameters

Step Abrasive / Surface Lubricant Time Force RPM (Head/Base)
1 (Rough) 1 µm DIAMAT diamond on ATLANTIS pad DIALUBE Purple Extender 2 min 5-10 lb (22-45 N) 100/100
Optional intermediate (T6 tempers, Al-Si) 3 µm DIAMAT diamond on ATLANTIS pad DIALUBE Purple Extender 2-3 min 5-10 lb (22-45 N) 100/100
2 (Final) 0.05 µm Nanometer alumina on NAPPAD pad 1 min 5-10 lb (22-45 N) 100/100

Step 6: Cleaning and Drying

Essential Steps

  • Rinse with DI water
  • Clean with alcohol
  • Dry with compressed air
  • Inspect for remaining contaminants
  • Store appropriately if not proceeding to etching
💡

Expert Guidance

Cleaning Protocol

  • Use ultrasonic cleaning for complex geometries
  • Rinse with DI water followed by alcohol
  • Use compressed air for drying
  • Store in desiccator if not etching immediately
⚙️

Technical Parameters

  • Ultrasonic frequency: 40 kHz
  • Cleaning time: 2-3 minutes
  • Air pressure: 2-3 bar
  • Storage humidity: < 40% RH

Step 7: Etching

Essential Steps

  • Select appropriate etchant
  • Prepare fresh etchant solution
  • Immerse or swab sample
  • Monitor etching progress
  • Rinse and dry immediately after etching
💡

Expert Guidance

Etching Selection

  • Keller's reagent — general purpose, reveals grain boundaries and second phases (primary)
  • Graff & Sargent's reagent — for age-hardened wrought alloys (2xxx and 7xxx series)
  • Barker's reagent — electrolytic anodization at 20-30V DC for grain orientation under polarized light
  • Weck's reagent — color tint etch for phase contrast under bright-field
  • Monitor etching time under microscope
⚙️

Technical Parameters

  • Keller's reagent: 10-30 seconds, swab or immerse
  • Graff & Sargent: 20-60 seconds, immerse with mild agitation
  • Barker's reagent: 1-3 minutes at 20-30V DC
  • Weck's reagent: 10-20 seconds, immerse
  • Temperature: 20-25°C; use fresh solutions only

Step 8: Microscopic Analysis

Essential Steps

  • Begin with low magnification overview
  • Examine at higher magnifications
  • Document key features
  • Record preparation parameters
  • Store sample appropriately
💡

Expert Guidance

Imaging Techniques

  • Use brightfield for general microstructure
  • Apply polarized light for grain structure
  • Consider DIC for enhanced contrast
  • Document with high-resolution imaging
⚙️

Technical Parameters

  • Initial magnification: 50-100x
  • Detail magnification: 200-500x
  • High-res magnification: 1000x
  • Image resolution: 2048x2048 pixels

Troubleshooting Guide

Common Issues and Solutions
  • Smearing: Reduce polishing pressure and time
  • Scratches: Check for embedded abrasive, clean cloths
  • Pull-out: Use gentler polishing steps
  • Over-etching: Reduce etching time, monitor progress
  • Contamination: Clean between steps, use fresh consumables

Similar Materials

Explore preparation procedures for related aluminum alloys and materials. These materials share similar preparation challenges and may require slight modifications to the standard aluminum procedure.

Class 1 specimen preparation chart

Class 1 Procedure

See the standard metallographic approach for aluminum-based alloys.