
Class 1 materials are characterized by their softness and high ductility. Most fall below 150 HV, though certain alloys (beryllium copper, aluminum bronzes, and manganese bronzes) can significantly exceed this in hardened tempers. They remain in Class 1 because their ductility and general preparation behavior align with this group. These materials are prone to deformation, smearing, and abrasive embedding during preparation, requiring careful technique to reveal true microstructural features.
Preparation Characteristics & Challenges
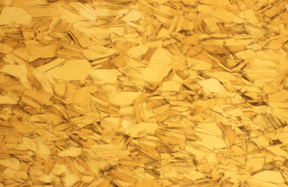
70-30 Brass, etched, 200X. Example of Class 1 material microstructure
Class 1 materials exhibit several distinctive properties that directly impact how they must be prepared:
Deformation & Smearing
Low hardness and high ductility cause material to plastically deform and smear over grain boundaries and second-phase particles during cutting, grinding, and polishing. Use sharp, fresh abrasives with light, consistent pressure and avoid excessive grinding steps to minimize subsurface damage.
Abrasive Embedding
Soft surfaces trap abrasive particles from SiC papers and diamond compounds, leaving permanent artifacts that can be mistaken for inclusions. Thorough ultrasonic cleaning between preparation steps is essential. Diamond grinding discs can reduce embedding compared to conventional SiC paper.
Work Hardening
Many Class 1 materials, especially aluminum and copper alloys, work harden during preparation. This altered surface layer can affect etching response and may be mistaken for intentional heat treatment effects. Minimize deformation at each step and use a final vibratory polish to help remove the affected layer.
Relief & Edge Rounding
Different phases and constituents polish at different rates, creating height differences that obscure fine microstructural features. Napped polishing cloths worsen relief and round specimen edges. Use napless or low-nap cloths and edge-retaining mounting compounds to maintain flatness.
Thermal Sensitivity
Low melting points (lead, tin, zinc) and age-sensitivity (2xxx, 6xxx, 7xxx aluminum; beryllium copper) require careful temperature control. Compression mounting temperatures (150-180°C) can over-age precipitation-hardened alloys or deform low-melting materials. Use castable mounting for heat-sensitive specimens and ensure adequate coolant during sectioning.
Oxide & Surface Layer Preservation
When analyzing anodized layers, corrosion products, or surface treatments in cross-section, oxide layers must be preserved through careful sectioning away from the area of interest and edge-retaining mounting media. For standard bulk microstructure examination, this is not typically a concern.
Grain Boundary Revelation
Residual deformation from over-grinding or aggressive polishing prevents grain boundaries from etching cleanly, even with the correct etchant. The deformation layer must be fully removed. A final polish with colloidal silica or a vibratory polishing step is often necessary before etching.
Class 1 Materials
The following materials are classified as Class 1 (Soft, Ductile Materials). Click on any material to view its detailed preparation procedures.
Aluminum Alloys
- 1100 Aluminum
- 2011 Aluminum
- 2017 Aluminum
- 2024 Aluminum
- 2024-T3 Aluminum
- 3003 Aluminum
- 3004 Aluminum
- 5052 Aluminum
- 5056 Aluminum
- 5083 Aluminum
- 5086 Aluminum
- 5454 Aluminum
- 5456 Aluminum
- 6005 Aluminum
- 6013 Aluminum
- 6061 Aluminum
- 6063 Aluminum
- 6082 Aluminum
- 7050 Aluminum
- 7075 Aluminum
- 7475 Aluminum
- A356 Cast Aluminum
- A380 Cast Aluminum
- AM AlSi10Mg (SLM)
Copper Alloys
- C11000 Electrolytic Tough Pitch Copper
- C17200 Beryllium Copper (aged temper exceeds 150 HV; still Class 1 prep behavior)
- C26000 Cartridge Brass
- C36000 Free-Cutting Brass
- C46400 Naval Brass
- C51000 Phosphor Bronze
- C63000 Aluminum Nickel Bronze (higher hardness in aged condition)
- C71500 Cupronickel 70-30
- C86300 Manganese Bronze (higher hardness in as-cast condition)
- C90700 Tin Bronze
- C93200 Leaded Tin Bronze
- C95400 Aluminum Bronze (heat-treated condition may exceed Class 1 range)
Magnesium Alloys
Zinc Alloys
Lead & Tin
Solder Alloys
Bearing Alloys
Precious Metals
Polymer Matrix Composites
Preparation Guide
Recommended Preparation Steps
Sectioning
Use low-speed abrasive cutting with continuous coolant flow and minimal feed rate to limit subsurface damage. Aluminum oxide blades are typical for non-ferrous metals. For small or delicate samples, precision wafering with a diamond blade provides the cleanest cut. For polymer composites, use diamond wafering blades to prevent fiber pullout and delamination.
Safety: Magnesium alloys produce pyrophoric particles when sectioned dry. Always use water-based coolant and never allow dry cutting. Keep a Class D fire extinguisher accessible when working with magnesium.
Mounting
Castable (cold) mounting is preferred for heat-sensitive alloys such as age-hardened aluminum, tempered beryllium copper, and low-melting-point metals (lead, tin, solder, babbitt). Compression mounting is acceptable for non-heat-sensitive materials. Use edge-retaining compounds when edge preservation matters. For porous polymer composites, vacuum impregnation with low-viscosity epoxy is essential to fill voids and prevent fiber pullout during grinding.
Grinding
Start at 240-320 grit SiC after proper sectioning and progress through 400, 600, 800, and 1200 grit. Use light, consistent pressure; heavy loads cause deformation that propagates into subsequent steps. Clean thoroughly between grits to prevent carryover. Diamond grinding discs are an alternative that reduces abrasive embedding.
Polishing
Use napless or low-nap cloths to minimize relief and edge rounding. Polish with 9 µm then 3 µm diamond suspension, followed by a final step with 0.05 µm colloidal silica on a napless cloth. Vibratory polishing (1-4 hours) as a final step produces excellent surface quality and removes residual deformation. Use contra-rotation to reduce directional smearing.
Etching
Soft materials etch quickly. Start with short immersion times and increase as needed. Swab etching offers better control than immersion for many Class 1 materials. Verify that the deformation layer has been fully removed before etching; residual damage will obscure grain boundaries regardless of etchant selection. Precious metals are the exception: gold and platinum are chemically inert and require aqua regia (platinum often heated to 50-70°C); silver responds to potassium dichromate or ferric chloride but tarnishes within minutes after etching and must be examined immediately.
Quality Verification
Check for absence of deformation under polarized light
Verify grain boundaries etch clearly and uniformly
Ensure second-phase particles are intact, not smeared
Confirm no embedded abrasive particles on polished surface
Check for minimal relief between different phases